🎇Day 31 : Launching your First Kubernetes Cluster with Nginx running

Hey there! 👋
I'm Pratik R. Mandge, a DevOps Engineer passionate about all things AWS DevOps Technology. Currently on a learning adventure, I'm here to share my journey and Blog's in the world of cloud and DevOps.
🛠️ My focus? Making sense of AWS services, improving CI/CD, and diving into infrastructure as code. Whether you're fellow interns or curious enthusiasts, let's grow together in the vibrant DevOps space.
🌐 Connect with me for friendly chats, shared experiences, and learning moments. Here's to embracing the learning curve and thriving in the exciting world of AWS DevOps Technology!
Follow me on LinkedIn: https://www.linkedin.com/in/pratik-mandge363
🎡What is Minikube?
Minikube is a tool that enables you to run Kubernetes locally on your machine. It creates a single-node Kubernetes cluster on your local computer, allowing you to develop and test Kubernetes applications without needing to set up a full-scale cluster. Minikube is great for learning Kubernetes, testing deployments, and developing applications that will eventually be deployed on a larger Kubernetes cluster.
🎡Features of Minikube
Minikube offers several key features that make it a valuable tool for developers and Kubernetes enthusiasts:
Local Kubernetes Cluster: Minikube allows you to run a single-node Kubernetes cluster on your local machine, enabling you to develop and test Kubernetes applications in a local environment.
Easy Setup: Minikube is easy to set up and can be installed on various operating systems, including Linux, macOS, and Windows, with minimal dependencies.
Isolation: Minikube provides an isolated Kubernetes environment, allowing you to experiment with Kubernetes features without affecting your production environment.
Resource Management: Minikube allows you to specify resource constraints, such as CPU and memory limits, for the Kubernetes cluster, making it suitable for testing resource-intensive applications.
Add-ons: Minikube supports various add-ons, such as Kubernetes Dashboard, Heapster, and others, to enhance your Kubernetes experience.
Kubernetes Version Support: Minikube supports running different versions of Kubernetes, allowing you to test your applications against specific Kubernetes versions.
Integration with Docker: Minikube seamlessly integrates with Docker, allowing you to build and deploy Docker containers on the Minikube Kubernetes cluster.
Networking: Minikube provides networking features that allow your Kubernetes pods to communicate with each other and with the outside world.
Storage: Minikube supports various storage options, such as local storage, hostPath, and NFS, for storing data in your Kubernetes applications.
Generally, Minikube is a powerful tool for learning, testing, and developing Kubernetes applications in a local environment.
🎡Pre-requisites
♦️Ubuntu / AWS EC2 instance with t2.medium type or above.
♦️kubectl
♦️Docker
♦️Internet Access
🛠Task : Install minikube on your local & Create your first pod on Kubernetes through minikube.
🖌Update your system packages

sudo apt-get update
🖌Install Curl Package

sudo apt install -y curl wget apt-transport-https
🖌Install the Docker

sudo apt install -y docker.io
🖌Start and Enable Docker

sudo systemctl enable docker
🖌Add the current user to the docker group (To use docker without root)
sudo usermod -aG docker $USER && newgrp docker
🖌Then Once Reboot your system
sudo reboot
🖌To Check Current user add to Docker Group

cat /etc/group

✒️Now, Install Minikube

curl -Lo minikube https://storage.googleapis.com/minikube/releases/latest/minikube-linux-amd64
Make it executable and move it into your path:
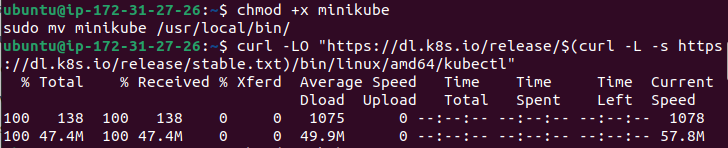
chmod +x minikube
sudo mv minikube /usr/local/bin/
✒️Install the Kubectl
curl -LO "https://dl.k8s.io/release/$(curl -L -s https://dl.k8s.io/release/stable.txt)/bin/linux/amd64/kubectl"
🖌Make it executable and move it into your path:
chmod +x kubectl
sudo mv kubectl /usr/local/bin/
🖌Then, Start the Minikube
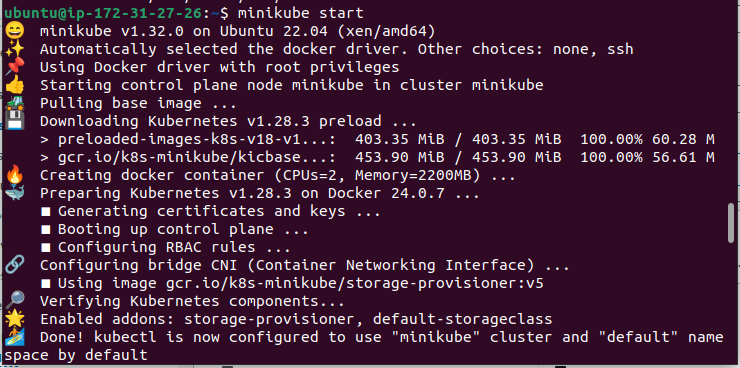
minikube start --driver=docker
🖌Check Your minikube status

minikube status
✒️Then, make nginx-pod.yaml file
apiVersion: v1
kind: Pod
metadata:
  name: nginx-pod
spec:
  containers:
  - name: nginx
    image: nginx:latest
    ports:
    - containerPort: 80
🖌Then run nginx-pod

kubectl apply -f nginx-pod.yaml
🖌Check pod is in running state

kubectl get pods
🖌For delete the pod

kubectl delete pod nginx-pod
🖌When you are done, you can stop the Minikube cluster

minikube stop
🖌To delete minikube cluster

minikube delete
I think this blog will be quite valuable, offering unique viewpoints and introducing new and engaging ideas. 🙏
😊 Happy learning!


