🥈Two-Tier Application Deployment with Docker
"Efficiently Scaling and Managing Applications with Docker: A Two-Tier Deployment Approach"

Hey there! 👋
I'm Pratik R. Mandge, a DevOps Engineer passionate about all things AWS DevOps Technology. Currently on a learning adventure, I'm here to share my journey and Blog's in the world of cloud and DevOps.
🛠️ My focus? Making sense of AWS services, improving CI/CD, and diving into infrastructure as code. Whether you're fellow interns or curious enthusiasts, let's grow together in the vibrant DevOps space.
🌐 Connect with me for friendly chats, shared experiences, and learning moments. Here's to embracing the learning curve and thriving in the exciting world of AWS DevOps Technology!
Follow me on LinkedIn: https://www.linkedin.com/in/pratik-mandge363
🌌First Let's go through the overview.
I've been working on deploying a 2-tier Flask application using Docker. First, I containerized the application and then pushed the image to Docker Hub. For the database, I decided to go with MySQL. To simplify the management of the containers and ensure they're on the same network, I used Docker Compose. This setup has made deploying and managing the application's components much easier. With Docker Compose, I could define all the services, networks, and volumes in a single file, streamlining the deployment process. Pushing the Docker image to Docker Hub also means that I can deploy the application on any machine with Docker installed with ease. MySQL provides a reliable and scalable data storage solution for my application. Overall, leveraging Docker's containerization technology and Docker Compose's orchestration capabilities has allowed me to create a robust and scalable deployment environment for my Flask application.
🌌Let's understand which Tools & Technology we need to make this application
👨💻EC2
Amazon Elastic Compute Cloud (Amazon EC2) is a web service that provides resizable compute capacity in the cloud. It is designed to make web-scale computing easier for developers. EC2 allows you to quickly scale up or down to handle changes in requirements or spikes in traffic, paying only for the compute capacity you use.
With EC2, you can launch virtual servers, known as instances, on the AWS cloud. These instances can be configured with various CPU, memory, storage, and networking capabilities to meet your specific needs. You can choose from a wide range of instance types optimized for different use cases, such as general-purpose computing, memory-intensive applications, or graphics processing.
EC2 instances run on virtualized hardware, providing you with the flexibility to start, stop, and manage your instances as needed. You can also use EC2 features such as auto-scaling to automatically adjust the number of instances based on demand, ensuring that your application remains responsive and cost-effective.
Overall, EC2 provides a scalable and cost-effective solution for running applications in the cloud, without the need to invest in and manage physical hardware.
👨💻GitHub
It is a web-based platform used for version control and collaboration on software development projects. It provides a platform for developers to host their code repositories and collaborate with others. Here are some key features of GitHub:
Version Control: GitHub uses Git, a distributed version control system, to track changes to files and manage different versions of a project. Developers can create branches to work on new features or fixes and merge them back into the main branch when ready.
Collaboration: GitHub facilitates collaboration among team members by allowing them to review and discuss code changes, suggest improvements, and track issues and bugs using the built-in issue tracking system.
Code Hosting: GitHub provides a place to host code repositories, making it easy for developers to share their code with others and contribute to open-source projects.
Integration: GitHub integrates with a wide range of development tools and services, such as continuous integration (CI) systems, project management tools, and code editors, to streamline the development workflow.
Community: GitHub has a large and active community of developers, making it a valuable resource for learning, sharing knowledge, and finding solutions to coding problems.
Overall, GitHub is a powerful platform that helps developers collaborate on projects, manage code changes, and build software more efficiently.
👨💻Docker
It is a platform and tool that allows you to develop, deploy, and run applications inside containers. Containers are lightweight, standalone, and executable packages that contain everything needed to run a piece of software, including the code, runtime, libraries, and dependencies.
👨💻Dockerfile
A Dockerfile is a text document that contains a set of instructions for building a Docker image. It defines the environment inside a container, including the base image to use, any dependencies to install, environment variables to set, and commands to run.
👨💻Docker Image
A Docker image is a lightweight, standalone, executable package that contains everything needed to run a piece of software, including the code, runtime, libraries, dependencies, and configuration files.
Docker images are stored in a registry, such as Docker Hub, which allows them to be easily shared and distributed. When you run a Docker image, it is instantiated as a container, which is a running instance of the image. Multiple containers can be created from the same image, each running in its own isolated environment.
Docker images are designed to be portable and can run on any machine that has Docker installed, regardless of the underlying operating system or hardware. This makes Docker images an ideal solution for building and deploying applications in a consistent and reproducible manner across different environments.
👨💻Docker-compose
Docker Compose is a tool provided by Docker that allows you to define and run multi-container Docker applications. It uses a YAML file (docker-compose.yml) to configure the services, networks, and volumes for your application, making it easy to manage complex Docker environments.
With Docker Compose, you can define the services that make up your application, such as web servers, databases, and other dependencies, and specify how they should be connected and configured. You can also define environment variables, volumes, and other settings for each service.
Once you have defined your application's configuration in a docker-compose.yml file, you can use the docker-compose command to start, stop, and manage your application. Docker Compose will automatically create the necessary containers, networks, and volumes based on your configuration, making it easy to deploy your application consistently across different environments.
Overall, Docker Compose simplifies the process of managing multi-container Docker applications, allowing you to define your application's architecture in a single file and manage it with a single command.
👨💻Docker Hub
Docker Hub is a cloud-based registry service provided by Docker that allows you to store and share Docker images. It serves as a central repository for Docker images, making it easy for developers to find, share, and collaborate on containerized applications.
Docker Hub provides a vast collection of pre-built images that you can use as base images for your own applications. These images are built and maintained by the community, as well as by official Docker repositories, ensuring that they are up-to-date and secure.
In addition to storing Docker images, Docker Hub also provides features for managing and organizing your images, such as tags, which allow you to version your images, and repositories, which allow you to group related images together.
Docker Hub offers both free and paid plans, with the free plan providing basic features such as public repositories and limited image storage, and the paid plans offering additional features such as private repositories, increased image storage, and team collaboration tools.
Overall, Docker Hub is a valuable resource for developers looking to build and deploy containerized applications, providing a central repository for finding, sharing, and managing Docker images.
👨💻Docker Volume
In Docker, a volume is a way to persist data generated by and used by Docker containers. Volumes are stored outside the container's filesystem, in the host filesystem or in a remote storage service, depending on the volume driver used.
Here are some key points about Docker volumes:
Persistent Storage: Volumes provide a way to store data generated by containers persistently, even after the container is stopped or deleted. This is useful for storing application data, logs, and configuration files.
Shared Data: Volumes can be shared between containers, allowing multiple containers to access and modify the same data. This is useful for sharing data between containers in a multi-container application.
Mount Points: Volumes are mounted into containers as directories, similar to a network share or a USB drive. Containers can read from and write to the volume as if it were a local directory.
Types of Volumes: Docker supports several types of volumes, including host-mounted volumes, named volumes, and anonymous volumes. Each type has its own use cases and benefits.
Managing Volumes: Volumes can be managed using the Docker CLI or through Docker Compose. You can create, inspect, remove, and manage volumes using these tools.
Overall, Docker volumes provide a flexible and convenient way to manage persistent data in Docker containers, making it easier to build and deploy applications that require persistent storage.
👨💻Docker Network
Docker networking allows containers to communicate with each other and with external networks. Docker provides several networking options, each with its own use cases and configurations. Here are some key points about Docker networking:
Default Bridge Network: When you install Docker, it creates a default bridge network called
bridge. Containers connected to this network can communicate with each other using IP addresses. However, containers on the default bridge network are not accessible from outside the host by default.Host Network: Using the
hostnetwork mode, containers can use the networking stack of the host machine, bypassing Docker's network isolation. This can improve networking performance but may pose security risks.Overlay Network: Overlay networks allow containers running on different Docker hosts to communicate with each other, enabling multi-host networking. This is useful for deploying applications across multiple hosts in a cluster.
Macvlan Network: Macvlan allows you to assign a MAC address to a container, making it appear as a physical device on the network. This is useful for scenarios where you need containers to be directly accessible on the network.
Custom Bridge Networks: You can create custom bridge networks with Docker, allowing you to define your own network configurations and connect containers to them. Custom bridge networks provide isolation and allow containers to communicate with each other within the same network.
External Connectivity: Docker containers can be connected to external networks, such as the host network or a physical network interface, using port mapping or bridge networking.
Overall, Docker networking provides a flexible and powerful way to connect containers and manage their network configurations, enabling you to build complex and scalable applications with ease.
👨💻MYSQL
MySQL is an open-source relational database management system (RDBMS) that is widely used for building scalable, high-performance web applications. It is known for its reliability, ease of use, and robust features, making it a popular choice for developers and organizations.
Some key features of MySQL include:
Relational Database: MySQL is a relational database, which means that it stores data in tables with rows and columns. It uses Structured Query Language (SQL) for querying and manipulating data.
Scalability: MySQL is designed to scale from small, single-user applications to large, multi-user applications. It supports clustering and replication for high availability and scalability.
Performance: MySQL is optimized for performance, with features such as indexing, caching, and query optimization to ensure fast data retrieval and processing.
Ease of Use: MySQL is known for its ease of use, with a simple installation process and a user-friendly interface for managing databases.
Compatibility: MySQL is compatible with many operating systems and programming languages, making it easy to integrate with existing systems and applications.
Community Support: MySQL has a large and active community of developers and users who provide support, documentation, and resources for using MySQL.
Overall, MySQL is a powerful and reliable database management system that is suitable for a wide range of applications, from small, personal projects to large, enterprise-level applications.
🌌Now, Here we go through the 2-Tier Application Deployment with Docker
We will see how to troubleshoot while making the 2-Tier App.
✔️Login to AWS Console.
✔️Search EC2 & Click on Launch Instances.
✔️Fill the form 1) Name of Instance 2) Select Ubuntu Image 3) Instance Type- t2.micro 4) Create New Key-Pair 5) Launch Instance.
✔️Connect the Instance-> You'll get Ubuntu Terminal.
✔️Update the System & Install Docker.
sudo apt-get update # Update the System
sudp apt-get install docker.io # Install Docker
✔️Changes the Ownership of the Docker socket file to the current user.
sudo chown $USER /var/run/docker.sock
✔️To Check the List of the Container.
docker ps # Check list of container
✔️Then Go to GitHub, Clone the Repository.
git clone https://github.com/mandgepratik/two-tier-flask-app.git # URL of your Repository
✔️Check the Repository clone or not.
ls # listing the directory.
✔️Change the Directory.
cd two-tier-flask-app/ # Your Clone Directory Name
✔️Make Dockerfile.
# Use an official Python runtime as the base image
FROM python:3.9-slim

# Set the working directory in the container
WORKDIR /app

# install required packages for system
RUN apt-get update \
    && apt-get upgrade -y \
    && apt-get install -y gcc default-libmysqlclient-dev pkg-config \
    && rm -rf /var/lib/apt/lists/*

# Copy the requirements file into the container
COPY requirements.txt .

# Install app dependencies
RUN pip install mysqlclient
RUN pip install --no-cache-dir -r requirements.txt

# Copy the rest of the application code
COPY . .

# Specify the command to run your application
CMD ["python", "app.py"]
✔️Now, Build Dockerfile.
docker build . -t flaskapp
✔️Check the Image of flaskapp
docker images # To check the images
✔️Now, go to your EC2 instance security group open port no. 5000 & save it.
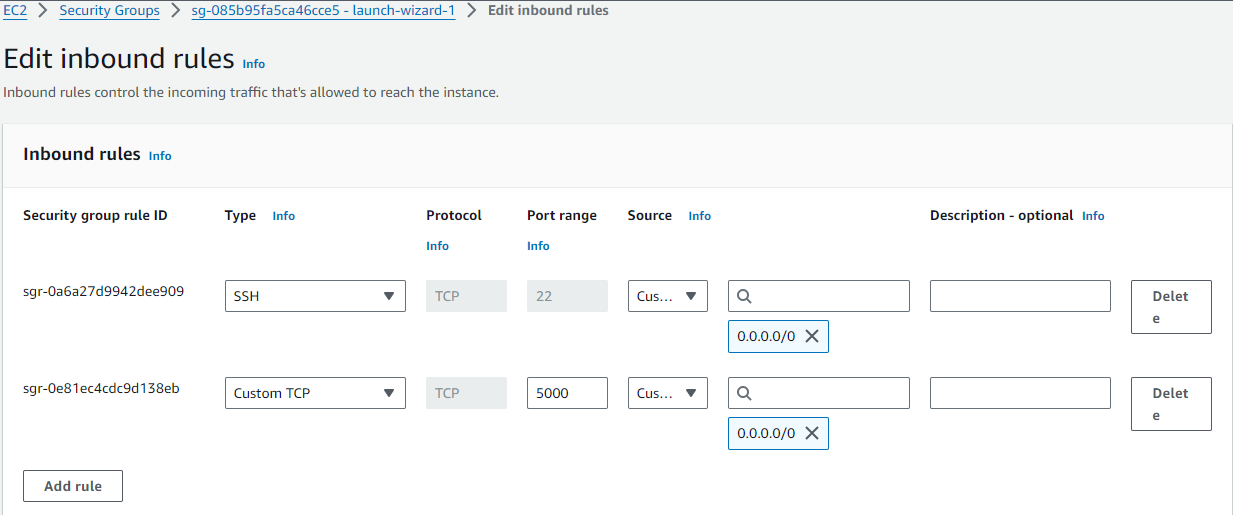
✔️Now run the container of flaskapp
docker run -d -p 5000:5000 flaskapp:latest
✔️Then for collecting data of flaskapp Mysql connect through local server
docker run -d -p 3306:3306 --name mysql -e MYSQL_ROOT_PASSWORD="admin" mysql:5.7
✔️To check containers running or not
docker ps
✔️Now both containers are running on different Network so, create network to add both container in 1 network.
docker network create twotier # Two tier is network name(you can change network name)
✔️Now, kill the both containers that are not in same network.
docker kill <containerID> # you can kill muiltiple containers, you just add container_ID one by one
✔️Check, Now Images will get empty.
docker images
✔️Then, once again to attach both containers in same network.
docker run -d -p 5000:5000 --network=twotier -e MYSQL_HOST=mysql -e MYSQL_USER=admin -e MYSQL_PASSWORD=admin -e MYSQL_DB=myDb flaskapp:latest  #to attach in same network
docker run -d -p 3306:3306 --network=twotier -e MYSQL_DATABASE=myDb -e MYSQL_USER=admin -e MYSQL_PASSWORD=admin -e MYSQL_ROOT_PASSWORD=admin mysql:5.7 #to attach in same network
✔️Check, whether both containers are in same network or not
docker network ls
✔️To Inspect twotier network but, Still it shows container name different.
docker network inspect twotier
✔️So, Once again kill the both containers
docker kill <containerID>
✔️Run the both container again
docker run -d -p 5000:5000 --network=twotier -e MYSQL_HOST=mysql -e MYSQL_USER=admin -e MYSQL_PASSWORD=admin -e MYSQL_DB=myDb --name=flaskapp flaskapp:latest # run again container
docker run -d -p 3306:3306 --network=twotier -e MYSQL_DATABASE=myDb -e MYSQL_USER=admin -e MYSQL_PASSWORD=admin -e MYSQL_ROOT_PASSWORD=admin --name=mysql mysql:5.7 # run the container if not work then remove old mysql container and run again mysql container
✔️Now, to go into Mysql database
docker exec -it <containerID> bash # your containerID will be different
✔️Enter the Password to enter into the database
mysql -u root -p # when you press the enter then give password to them. You can enter mysql database
✔️To check all datases in MYSQL.
show databases;
✔️To use particular database.
use myDb; # myDb is particular database name
✔️Now in myDb database Create Table Messages & run it.
CREATE TABLE messages (id INT AUTO_INCREMENT PRIMARY KEY, message TEXT); #syntax of create a table in database
✔️Now access your flaskapp using your EC2 public-ip:5000 & write something.
✔️You can check your data will get save in table.
select * from messages; # to check all data of the table
✔️To exit from database.
exit
✔️If you want to save your flaskapp image in Dockerhub, login to dockerhub.
docker login # Give username & password of your dockerhub

#Once login succeeded
✔️Now tag your image to username of docker with imagename
docker tag flaskapp:latest pratikm363/flaskapp:latest
✔️You can see image with your username
docker images
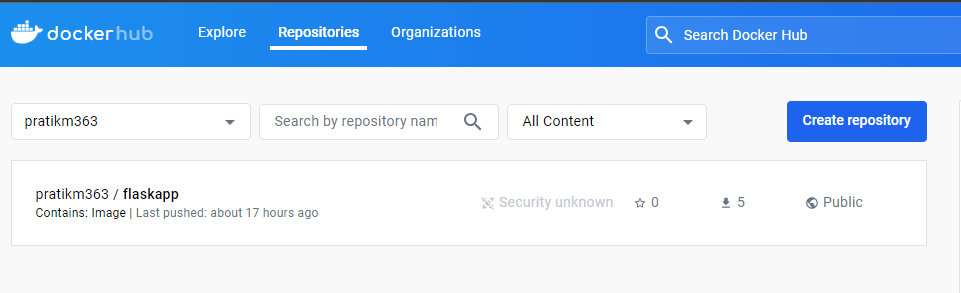
✔️Let's try to push image on dockerhub.
docker push pratikm363/flaskapp:latest
✔️Check with your dockerhub.
✔️If you want to run both containers in one command - flaskapp, mysql.
Install docker-compose.
sudo apt-get install docker-compose -y
✔️Make docker-compose.yml file.
version: '3'
services:

  backend:
    build:
      context: .
    ports:
      - "5000:5000"
    environment:
      MYSQL_HOST: mysql
      MYSQL_USER: admin
      MYSQL_PASSWORD: admin
      MYSQL_DB: myDb
    depends_on:
      - mysql

  mysql:
    image: mysql:5.7
    ports:
      - "3306:3306"
    environment:
      MYSQL_ROOT_PASSWORD: root
      MYSQL_DATABASE: myDb
      MYSQL_USER: admin
      MYSQL_PASSWORD: admin
    volumes:
      - ./message.sql:/docker-entrypoint-initdb.d/message.sql   # Mount sql script into container's /docker-entrypoint-initdb.d directory to get table automatically created
      - mysql-data:/var/lib/mysql  # Mount the volume for MySQL data storage

volumes:
  mysql-data:
✔️check docker container
docker ps
✔️Once again Kill & Remove both containers
docker kill <containerID> # kill both containers
docker rm <containerID> # remove both containers
✔️Now run docker-compose command. It will create network automatically.
docker-compose up -d  # it creates network automatically.
docker-compose down   # it down the access
✔️Finally, access your flask app -> publicip:5000
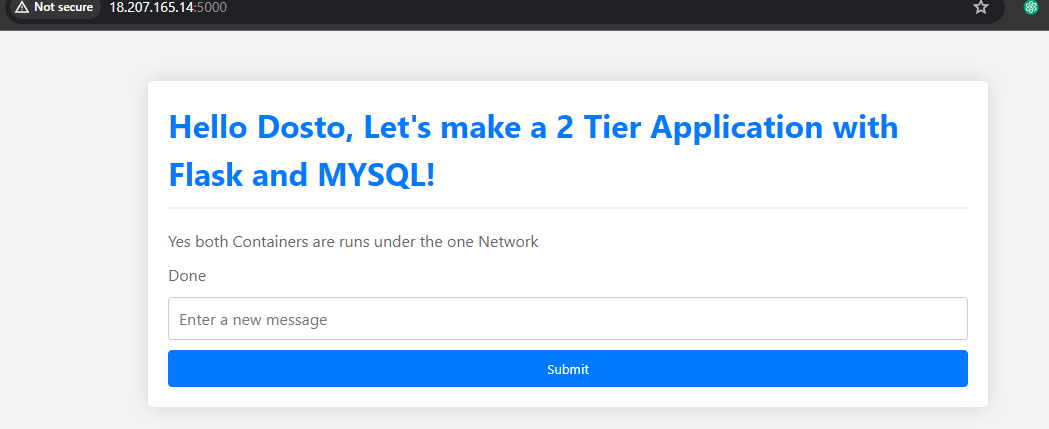
🎊This FlaskApp access under the one network.
💠Conclusion
In conclusion, deploying a two-tier application with Docker offers numerous benefits in terms of scalability, efficiency, and manageability. By containerizing your application components and using Docker Compose to define and manage the application's services, you can easily scale your application up or down to meet changing demands.
I believe this blog will be really helpful, giving you fresh perspectives and teaching you something new and interesting. 🙏
😊 Enjoy learning!


